Part 1: How to Remove Registry Entries in Windows 10 with Registry Editor Manually?
Part 2: How to Delete Registry Entries on Windows 10 with Tool Automatically?
How to Remove Registry Entries in Windows 10 with Registry Editor Manually?
Actually, in-built Registry editor is able to work when you want to erase registry entries for Windows 10 PC/computer. Because it stores some part of the software into it, you can permanently install that left part of the software or to remove some other content from registry by editing the registry settings.
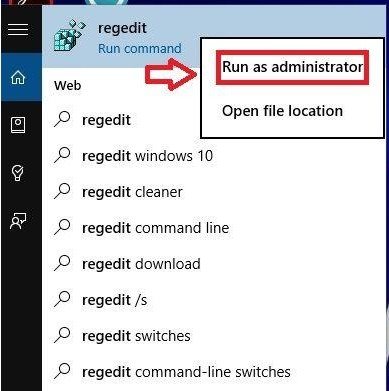
Step1. Navigate to search bar and type regedit and press Enter. Right click on it as picture below and select Run as administrator to run registry editor.
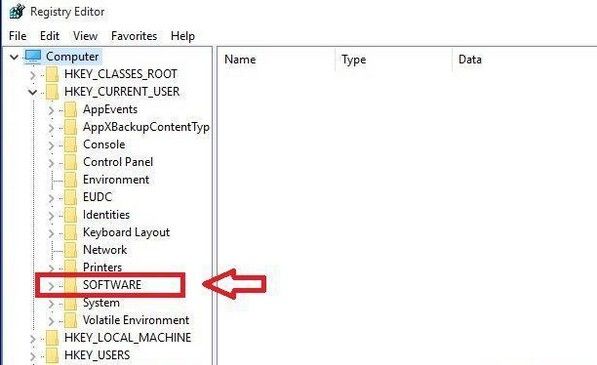
Step2. Now you will get into Registry Editor. Click on HKEY_CURRENT_USER to expand and then go to Software. Here you are allowed to see the list of the software installed in your system.
Step3. Before you decide to delete registry entries on a specific file, you have to have an idea about the owner of that particular software. Here I will take MS Office for example.
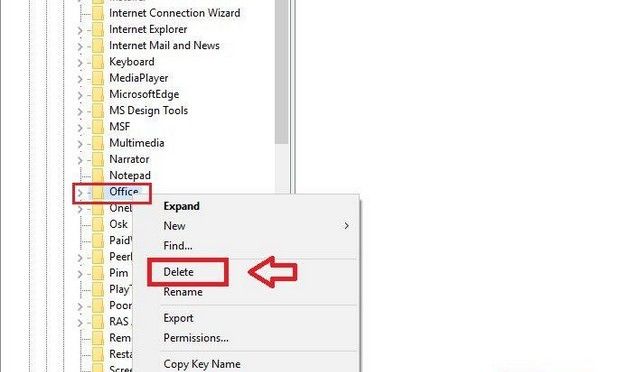
As I want to remove registry entries on MS Office, then I need find the folder named Microsoft. Once you find it out, click on the arrow to expand it. Under the Microsoft folder, you have to find Office folder. Here you can right click on it and choose the Delete option to remove it.
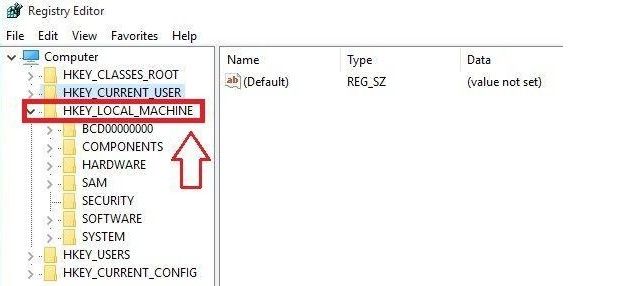
Step4. Close all the folders you have opened. Go to HKEY_LOCAL_MACHINE and expand it. Then you need to perform the same task, which you have done before.
Go to SOFTWARE and click Microsoft. Find Office out and right click on it. Finally click Delete to make confirmation. Don't forget to restart your computer, then your changes will be amended.
How to Delete Registry Entries on Windows 10 with Tool Automatically?
It is not uneasy to find that removing invalid registry files on Windows 10 with Registry Editor will be complicated and confused. You have to click various folders one by one. Is there any easier way to clear registry files? Definitely Yes!!! Windows Care Genius is a professional tool and optimizer to remove all junk files including registry entries, invalid system junk files, browsing history and so on with one click. Click download button and have a try on it. Then delete registry keys/values/files on Windows 10/8.1/8/7/XP as following steps.
Step1. Run the program after you downloaded and installed it on your computer. Click System Cleaner in the interface. Select Registry Cleaner and tap on Scan.
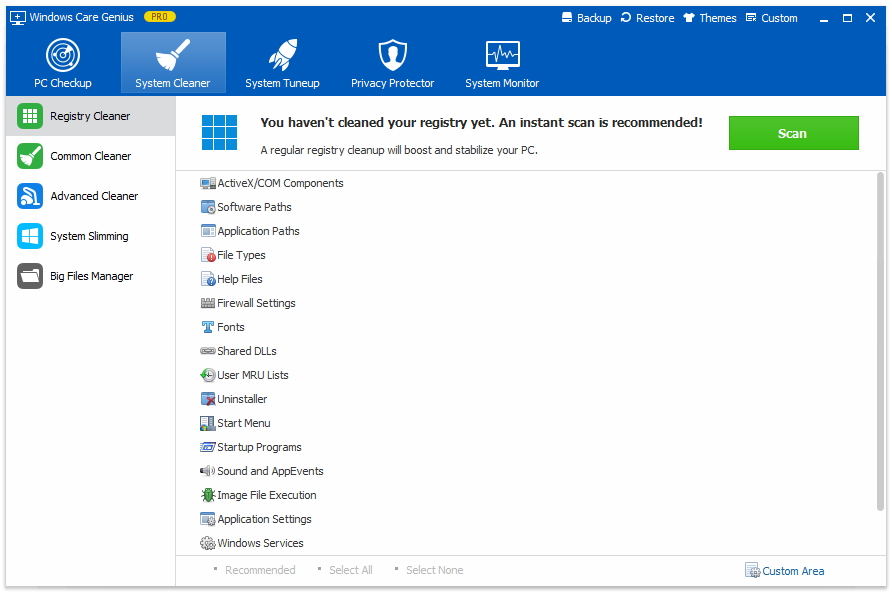
Step2. After scanning, all the invalid registry files will be detected and listed. Click on Clean and all the registries can be deleted effortlessly. You didn't need to find specific folder and open it and then delete it one by one.

Tips: If you want to check if how health your computer is, you are allowed to click PC Checkup. Then the program will automatically detect and rate it with specific score, so that you can know its health status clearly.
As long as you choose delicate tool, registry deletion in Windows 10 can be easier. If you have any problem, you are welcomed to leave it in the comment section.