What is EasyBCD?
What Can EasyBCD Do for You?
What is EasyBCD?
For most non-technical people, it is rare to get to know EasyBCD. Actually, EasyBCD is the ultimate bootloader modification toll created to give end users complete control over everything from that happens before and during Windows startup. At the same time, that is a powerful tool that has a wide-range of applications and usages. It can perform a variety of tasks ranging in complexity and application from the most basic to advanced and highly-customizable features.
What Can EasyBCD Do for You?
Boot anything: Windows, Linux, Mac, & BSD! Boot both from and into USB drives, ISO images, virtual disks, and more.
Boot anywhere: Create bootable USB sticks with repair utilities that you can take with you anywhere.
Protect against disaster: Create entries to boot into recovery utilities or safe mode to prepare for a rainy day.
Painless editing: Add, rename, remove, configure, and reorder entries at whim.
Solve difficult problems: Use EasyBCD to troubleshoot Windows, back up and repair the bootloader, and more.
Powerful scripting with NeoGrub: You'll have the power to hide partitions, change active flags, and create complex boot scenarios.
How to Create a Bootable USB with EasyBCD on Windows 10?
As you can see, it is equipped with many powerful functions. Here this picture-by-picture guide will show you how can you create a bootable Windows Recovery USB with EasyBCD on Windows 10. Before you start, you can get it from the Office EasyBCD Website and have to copy the ISO image from your computer to the vacant USB. Later, I will show you how to easily create a bootable USB on your Windows computer/laptop.
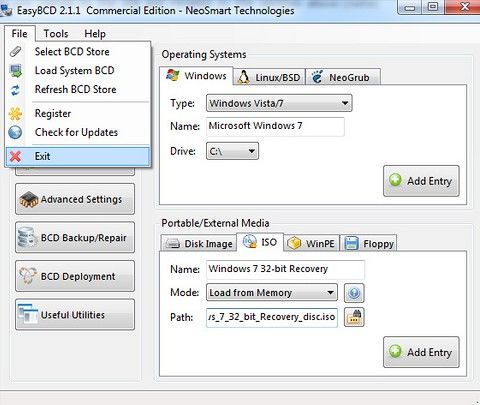
Step1. Run the program and click "BCD Deployment" in the EasyBCD Toolbox sidebar to get into a new page. Click on Partition on the drop-down box in the top-half of the screen and choose the entry that matches your USB drive.
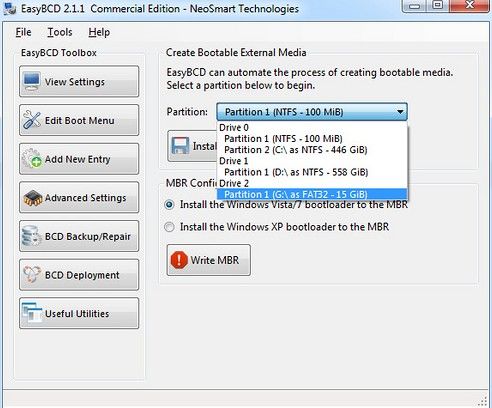
Step2. Here you have to tell EasyBCD to install the bootloader to the USB prepared previously so that it can boot from it. Click the Install BCD button to start and wait for a few minutes to finish.
Step3. EasyBCD will ask you if you want to load the newly-created BCD from the USB drive and press Yes to move on. Click the Add New Entry button the toolbox sidebar. Then click on the ISO tab in the buttom-half of the screen.
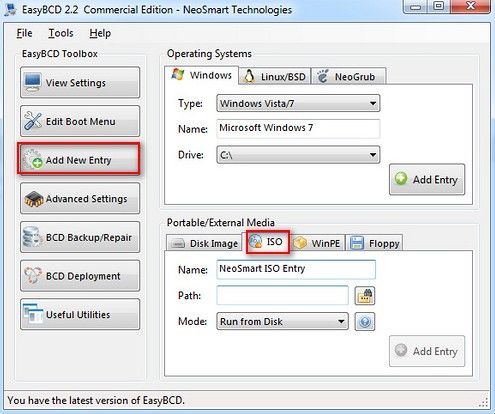
Step4. Make sure the mode in the ISO tab is set to "Run from Disk". Click the icon of the folder with three dots to open a browse file dialog. Use that to find the ISO image you copied to the USB drive.
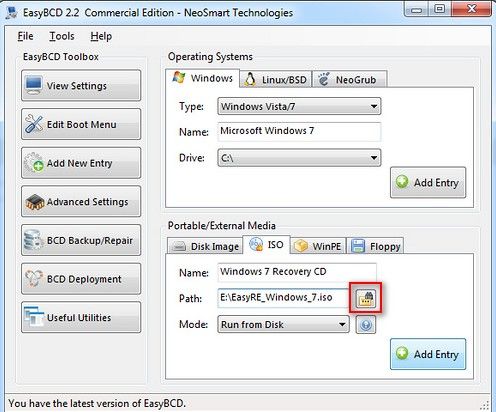
Step5. After select the ISO image you copied to the USB, you are supposed to click "Add Entry" button and then wait for it complete its task.
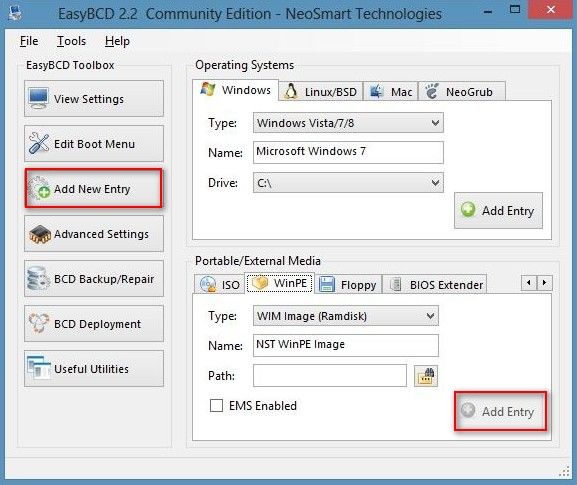
Step6. Close EasyBCD from the file menu. You have to make sure you don't remove the USB until EasyBCD has closed. Later you can remove the USB from your computer. Now your USB stick can be used to boot into the Windows 10/8/7 Recovery CD.
Actually there is another powerful tool Windows Boot Genius. It a can help you create a bootable CD/USB drive to restart inaccessible system as well. If you have any question, you can leave the comments in the comment section.