Many Windows users would love to disable secure boot on their PC; it gives them more flexibility by allowing them to install multiple operating systems. However, some can’t disable secure boot Windows 10. One such user expressed this on Tom’s Hardware Forum, stating,
“So I am trying to disable secure boot, I have watched a lot of videos. But my screen does not look like the one they have. I am running on Windows 8.1 using an Asus i7-4790S 64 bit. When I try to disable secure boot, it is greyed out and you cannot change it.”
Basically, stating that they can’t disable secure boot Asus. If you cannot disable secure boot Windows 10, just fret not, this article details how to go about it.
Part 2. Why Can't Turn off Secure Boot?
Part 3. Unable to Disable Secure Boot in BIOS, How to Fix?
Part 1. What is Secure Boot?
Secure Boot is a feature on Windows 8/ 8.1/ 10 that protects computers from malware attacks. Secure Boot enables the computer to resist attacks by listing keys that recognize firmware, operating system loader code, and hardware that can be trusted as well as listing keys that spot known malware. UEFI (Unified Extensible Firmware Interface,) limits the user to booting their computer hard drive and not CD or USB drive by running only signed bootloaders. Depending on your proficiency and technical know-how, you need to disable secure boot to have different boot options, run graphics cards and install multiple operating systems on your computer hence enabling dual booting of operating systems. It also helps you run previous versions of Windows and use Windows password recovery tools.
Part 2. Why Can't Turn off Secure Boot?
Can't disable secure boot Acer or any other PC? One reason might be that you don’t have the correct supervisor password. Secondly, the BIOS version might be outdated. You’ll need to update it.
Part 3. Unable to Disable Secure Boot in BIOS, How to Fix?
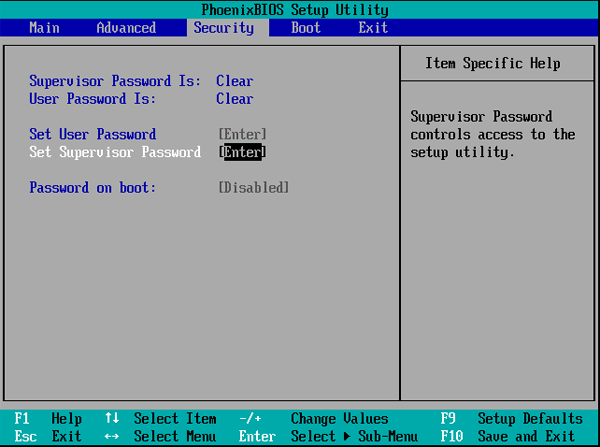
Way 1: Set up Supervisor Password
Step 1: Reboot your computer and enter BIOS Setup Utility by pressing F12 (it depends on your PC manufacturer model).
Step 2: Navigate to the “Security” tab using the arrow keys and select “Set Supervisor Password”.

Step 3: Enter the password then confirm it.

Step 4: Hit F10 and select “Yes” to save the changes.
Way 2: Update BIOS Version
The process of updating the BIOS differs from one PC and motherboard manufacturer to the next. However, there is a common beginning procedure. Follow it below.
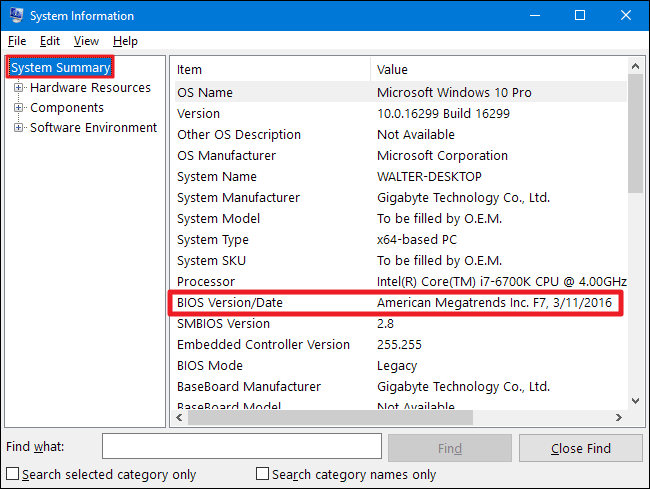
Step 1: Open System Information by typing “msinfo32” in the Run utility. (Launch Run by pressing Windows + R simultaneously).

Step 2: The BIOS date and version is displayed in the right pane of System Summary. Copy it.

Step 3: Download the BIOS version from the Download or Support page your motherboard manufacturer’s website or your PC manufacturer’s website.
Step 4: Extract the file and locate the readme.txt file which contains information on how to update BIOS. Read the file and follow the outlined procedure.
Conclusion
Wondering how to disable secure boot when no secure boot option in bios is visible? Contacting your PC manufacturer to have the issue resolved is also an option. You can check out this article for more details. Windows users who have lost their passwords can reset and recover them using Windows Password Recovery tool that allows them to recover passwords for administrator, standard and Microsoft accounts.
World's 1st Windows Password Recovery Software to Reset Windows Administrator & User Password.
Free Download Free Download