Would you mind that someone check or change your personal Windows 8 settings on your PC? If you don't like the unwanted person to see or use your apps, folders, files, mail, etc. you need to password protect Windows 8.
Free Download Free DownloadHow to Password Protect Windows 8?
There are four ways for you to set up restraints and stop others from accessing Windows 8 on your PC: local accounts, Microsoft account, picture password, and PIN logon. Let's specify them in four parts.
Part 1: Create A Local Account to Password Protect Windows 8
- Option 1: Login your PC, and follow the below steps:
- Step 1: Go to the Windows 8 Start Screen, and click "Settings", "Change PC settings".
- Step 2: Click "Users", "Add a user", and "Sign in without a Microsoft account".
- Step 3: Click "Local account", type a new name, password, the password hint, click "Next", and click "Finish".
- Option 2: If someone logged into your Windows 8 and changed your password, you can use Windows 8 Password Recovery Tool to create a new and strong local user account password to protect Windows 8 although you have no access to your PC.
- Step 1: Download and install Windows Password Recovery Tool on any available PC.
- Step 2: Create a Windows 8 password reset disk.
- Step 3: Insert the newly created reset disk on your own PC running Windows 8. And set BIOS to reboot your locked computer from the CD/DVD or USB. If your computer with Windows 8 preinstalled uses UEFI, you should disable UEFI Secure Boot firstly.
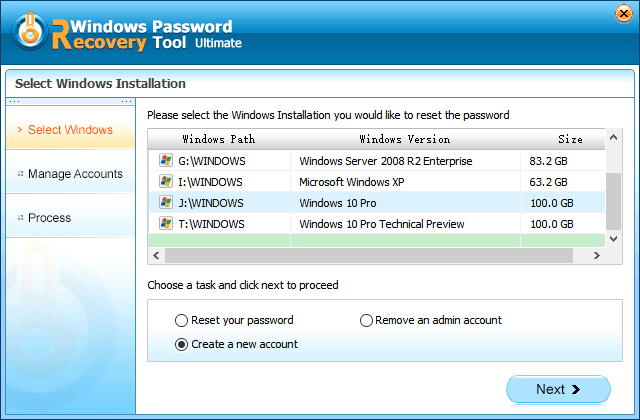
- Step 4: Select the Windows installation you would like to create a new account, choose "Create a new account", and click "Next".

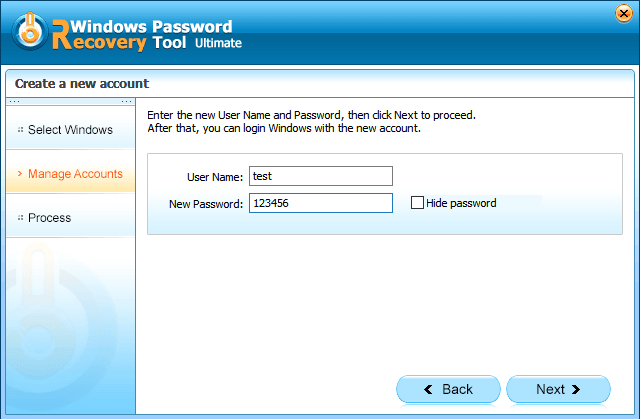
- Step 5: Type the new user name, password, and click "Next".

You have successfully created a local user account. Click "Reboot" button to restart your PC and use the new account to login Windows 8.
Part 2: Create A Microsoft Account to Password Protect Windows 8
To create a Microsoft account, you need to sign into Windows 8. If you forgot your log-in local or domain password, try PassFab Windows Password Recovery Tool to help you reset password and log into your PC. Then follow the guide below.
- Step 1: Go to the Windows 8 Start Screen, and click "Settings", "Change PC settings".
- Step 2: Click "Users", "Add a user", type an email which you frequently use, click "Next" and "Finish" to create a Microsoft account.
Part 3: Create Picture Password to Protect Windows 8
To create a strong picture password on your PC is helpful to prevent hackers from keeping guessing your user name and password, so as to password protect Windows 8 apps, folders, files, etc. Here is the simple guide.
- Step 1: Go to "Control Panel", "User Accounts and Family Safety", "User accounts", "Make changes to my account in the Settings App", "Users", "create a picture password".
- Step 2: Confirm with your local account or Windows 8 Account password and click "OK".
Note: Forgot your Windows 8 password? Try Window 8 Password Recovery to recover password.
- Step 3: Choose a picture, draw three gestures and confirm it to set up picture password.
Part 4: Set up PIN Logon to Password Protect Windows 8
This PIN consists of 4 digits as your password to protect Windows 8.
- Step 1: Go to Setting panel and display the PC Settings page.
- Step 2: Click "Users", "Create a PIN", and type your current password.
- Step 3: Enter your PIN and confirm it.
No matter what kind of ways you like to choose to password protect Windows 8, it is extremely significant to remember your password. In case that you forgot Windows 8 password and can't login your PC, use Window Password Recovery Tool to create a password reset disk to login the new system.
World's 1st Windows Password Recovery Software to Reset Windows Administrator & User Password.
Free Download Free Download
